Style Guide & Design System

OBJECTIVES
- Create visual and interaction consistency across the different parts of Primary's e-commerce web app.
- As a product design team of one, scale product design across the organization by empowering engineers and traditional marketing designers to easily make reasonable web design choices.
- Fold accessibility into the design system, so that all future products would pass WCAG 2.0 contrast ratios.
- Decrease the amount of code that needed to be loaded in order to improve site performance.
- Make it faster to design, code, and iterate on new products.
- Ensure that visual differences are meaningful and thought through.
BACKGROUND
I was the first product designer hired at Primary, and I would be a team of one for nearly all of my time there. Because of that, my first priority was creatig a way to scale my work for the biggest possible organizational impact. To achieve this, one of the first things that I tackled was a unified digital style guide/design system.
Before I started at Primary, digital products were designed by more traditional brand designers who didn't have much experience with or understanding of digital design or code. Engineers would custom-style every new component, which would both take a long time and create lots of bloat. As a result, the app CSS contained hundereds of different text style combinations, randomly-sized spacings, and dozens of slightly different interface colors. Most of these subtle variations weren't particularly purposeful or intentional — they were just symptomatic of a lack of systemic design thinking and poor design/engineering collaboration.
Fortunately, I was received buy-in on this idea very early on from both my manager and the engineering team. In fact, one of the senior engineers, who eventually became my first design system partner, had already taken it upon himself to do a visual audit of some existing patterns to highlight the many inconsistencies. This was an excellent jumping-off point for the project and our close collaboration.
CREATING THE STYLE GUIDE
1. Understanding the Problem: Despite knowing the importance of having a design system and having worked within one before, I had never created one from scratch, and had never needed to understand the way it would be structured in the code. Fortunately, my engineering partner had worked on a design system before at Etsy, and gave me a crash course on their design system's principles and a quick demonstration of how they used CSS utility classes, which was the first thing we would tackle.
I watched as he quickly changed the styling of some components by adding a combination of class names in the browser inspector. I had been used to CSS structured the other way around, with classes for specific components. By contrast, the utility class system seemed much easier to learn, manage, and apply and seemed way more flexible.
This left me to decide on what the text styles, spacers, and names themselves should be.
2. Research: I began by searching for design system resources online, and found a fairly mixed bag. Design systems were still rather new at the time (March 2018), and though there existed some documentation, there weren't quite as many that persuasively explained the reasons behind the choices. However, this article from Eightshapes and this article from Ether persuasively argued for a base-8 system for the following reasons:
- The base font size is usually 16px.
- Most standard screen sizes are divisible by 8.
- Base-8 scales better than base-10, as it can be divided evenly in half twice.
- Base-8 gives designers a good number of meaningful options, but not too many the way base-6 (which Etsy used at the time) might.
- Google's Material Design system is base-8, it scales well, and they probably put a lot of thought into it.
3. Design: Having decided on a base-8 system, many key decisions logically followed:
- Spacings would scale using the Fibonacci sequence per the suggestion from the Ether article.
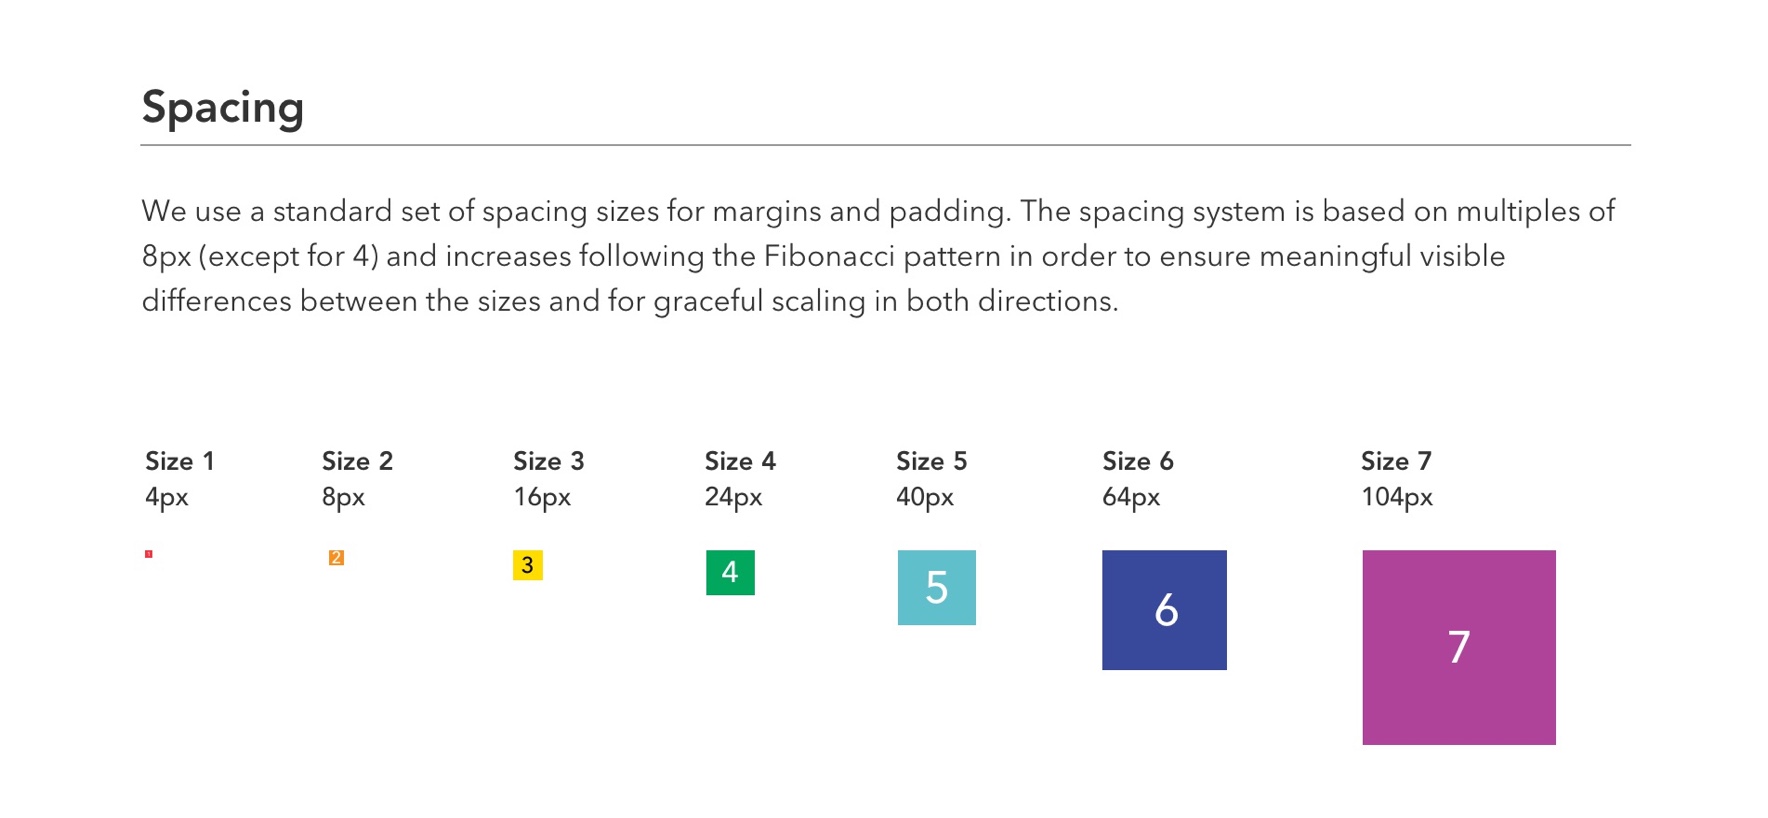 Primary's standard set of spacings.
 - The standard text size would be 16px, and text would scale up and down from there.Valuing numerical precision, I initially tried to create new text sizes in inrements of 8 and 4, once I tried creating some components, with the initial sizes, it was clear the system needed some more fine-grained scaling.After playing around with some different scaling options, I settled on differences of 2, 4, or multiples of 8, with the differences between adjacent styles being smaller going down, and larger going up. It wasn't quite as mathematically elegant as the Fibonacci sequence, but visually, it seemed to scale gracefully.
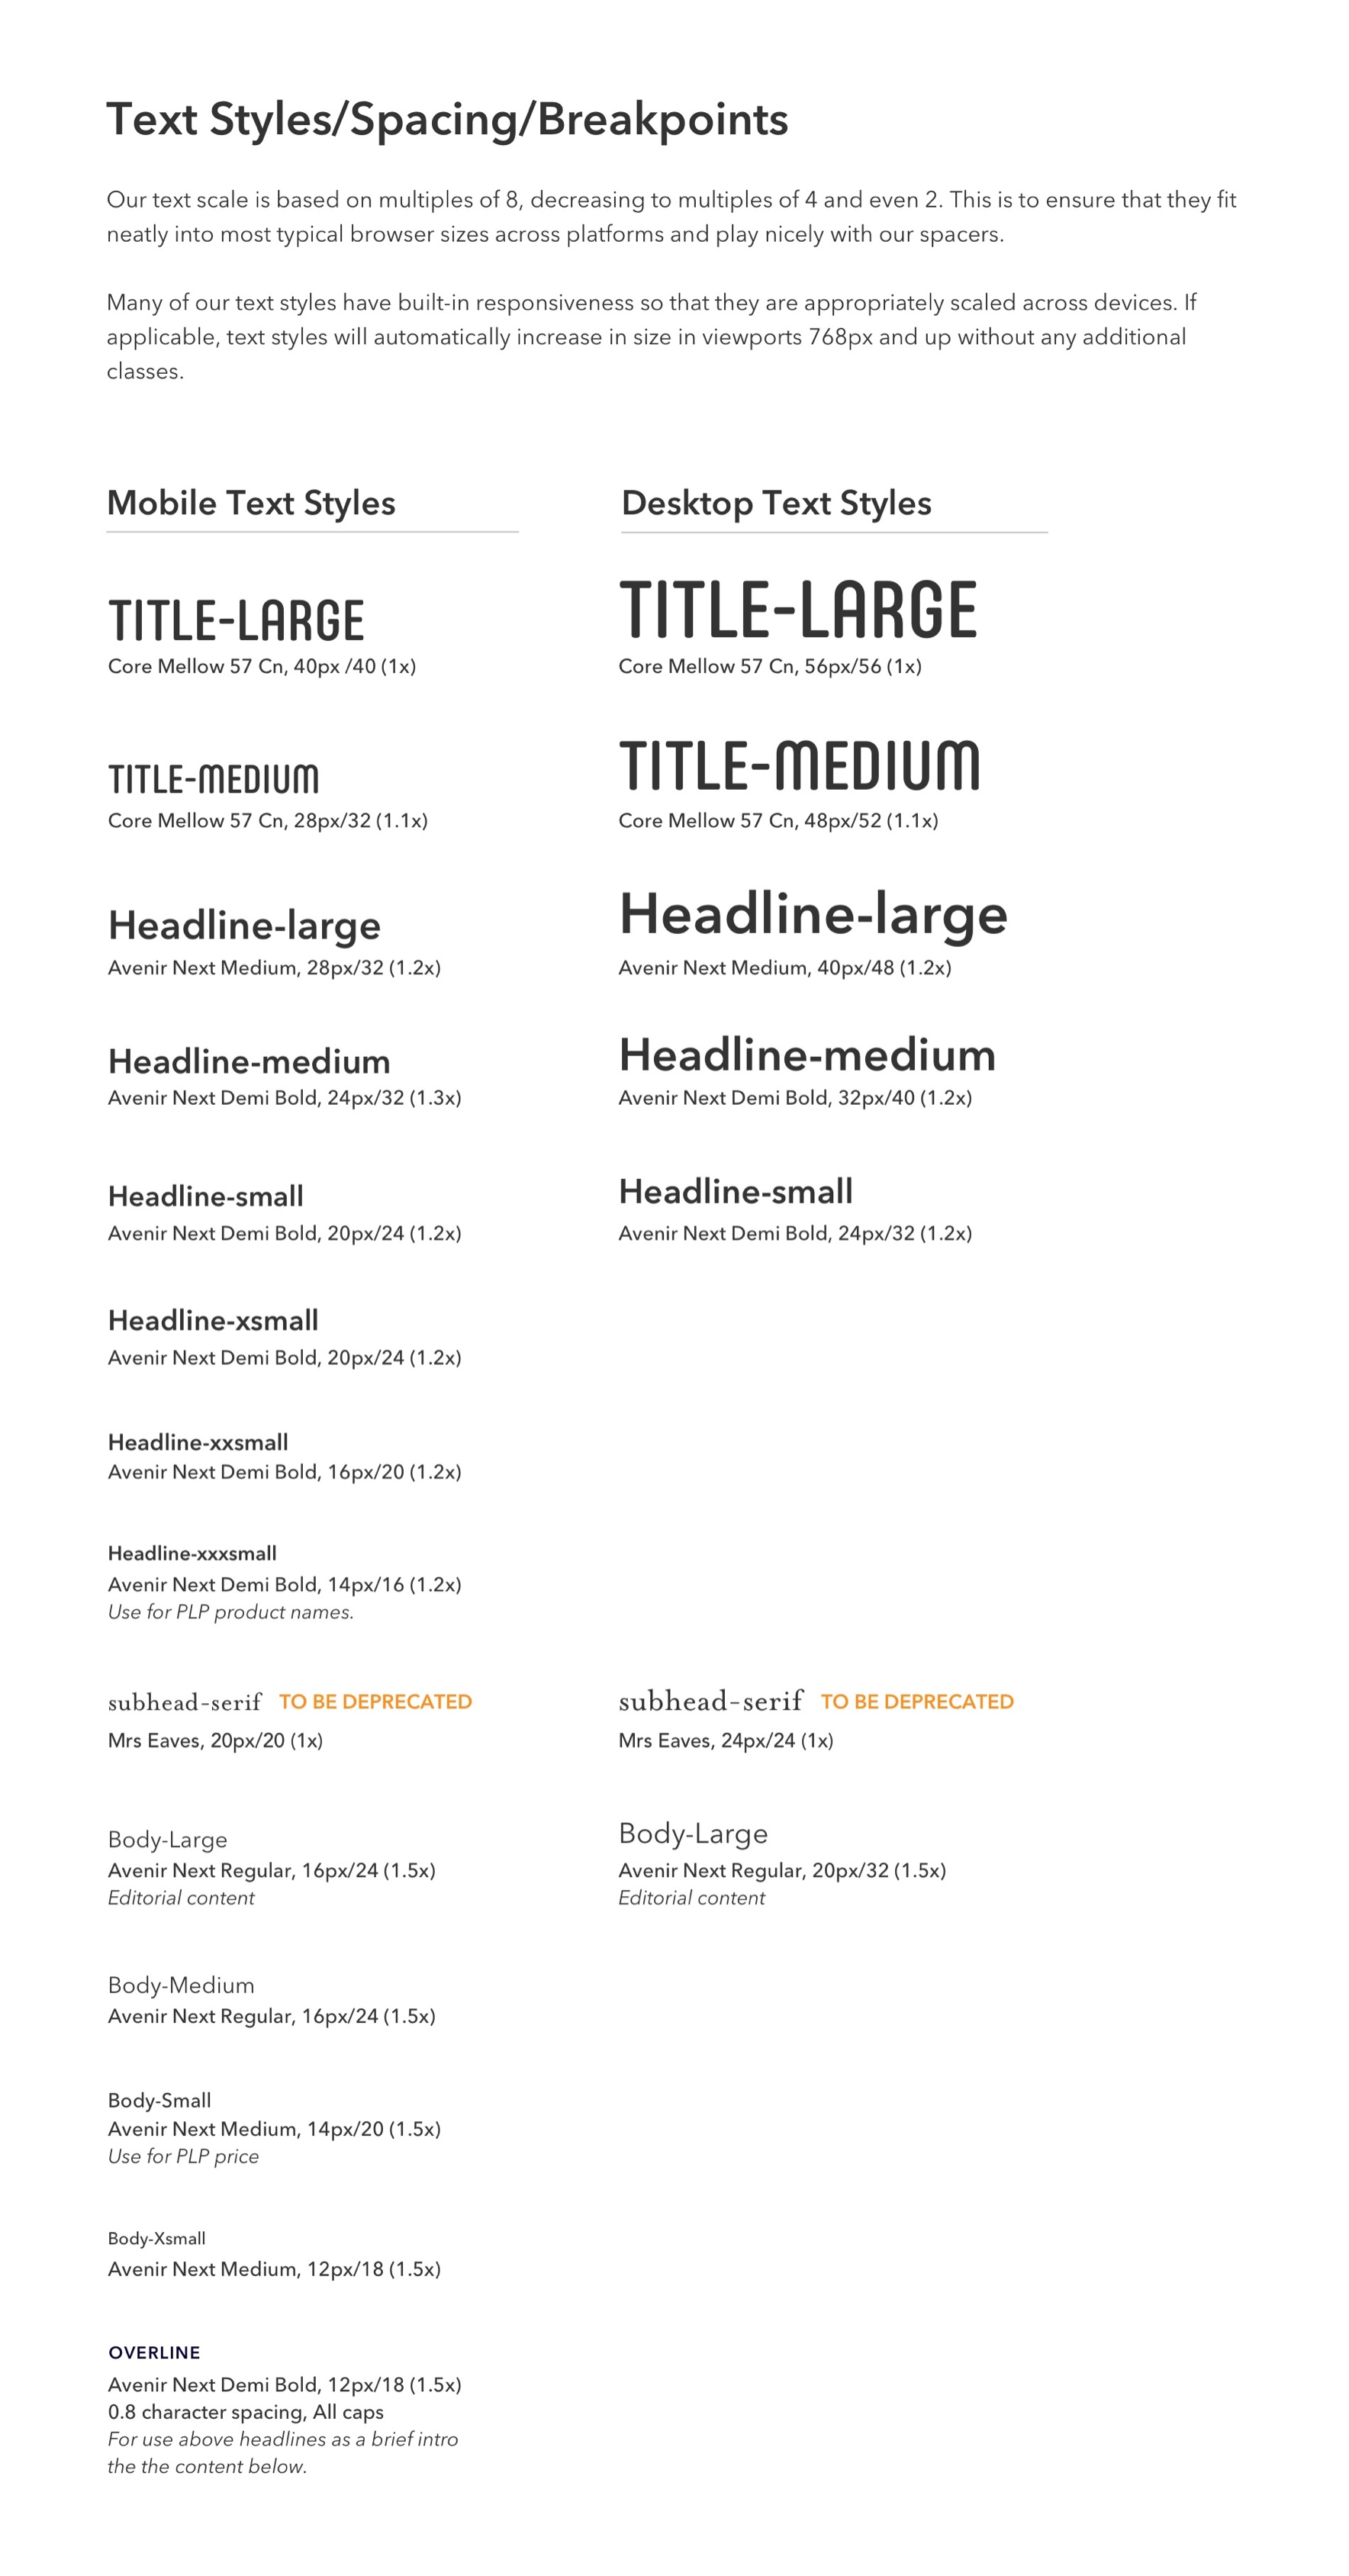 Primary's text styles.
 - I even initially tried creating my own grid system, roughly based on Bootstrap, but with 16px gutters instead of 15px ones, for the sake of maintaining a base-8 system. However, after discussing it with my engineering partner, I learned that we were already using the unadulterated Bootstrap grid on nearly all of our pages, and that even such a small change to the gutters could have a huge potential to break things all over the app. Because of that, though the numerical inconsistency bothered me, we decided to just keep our Bootstrap grid and breakpoints as they were.
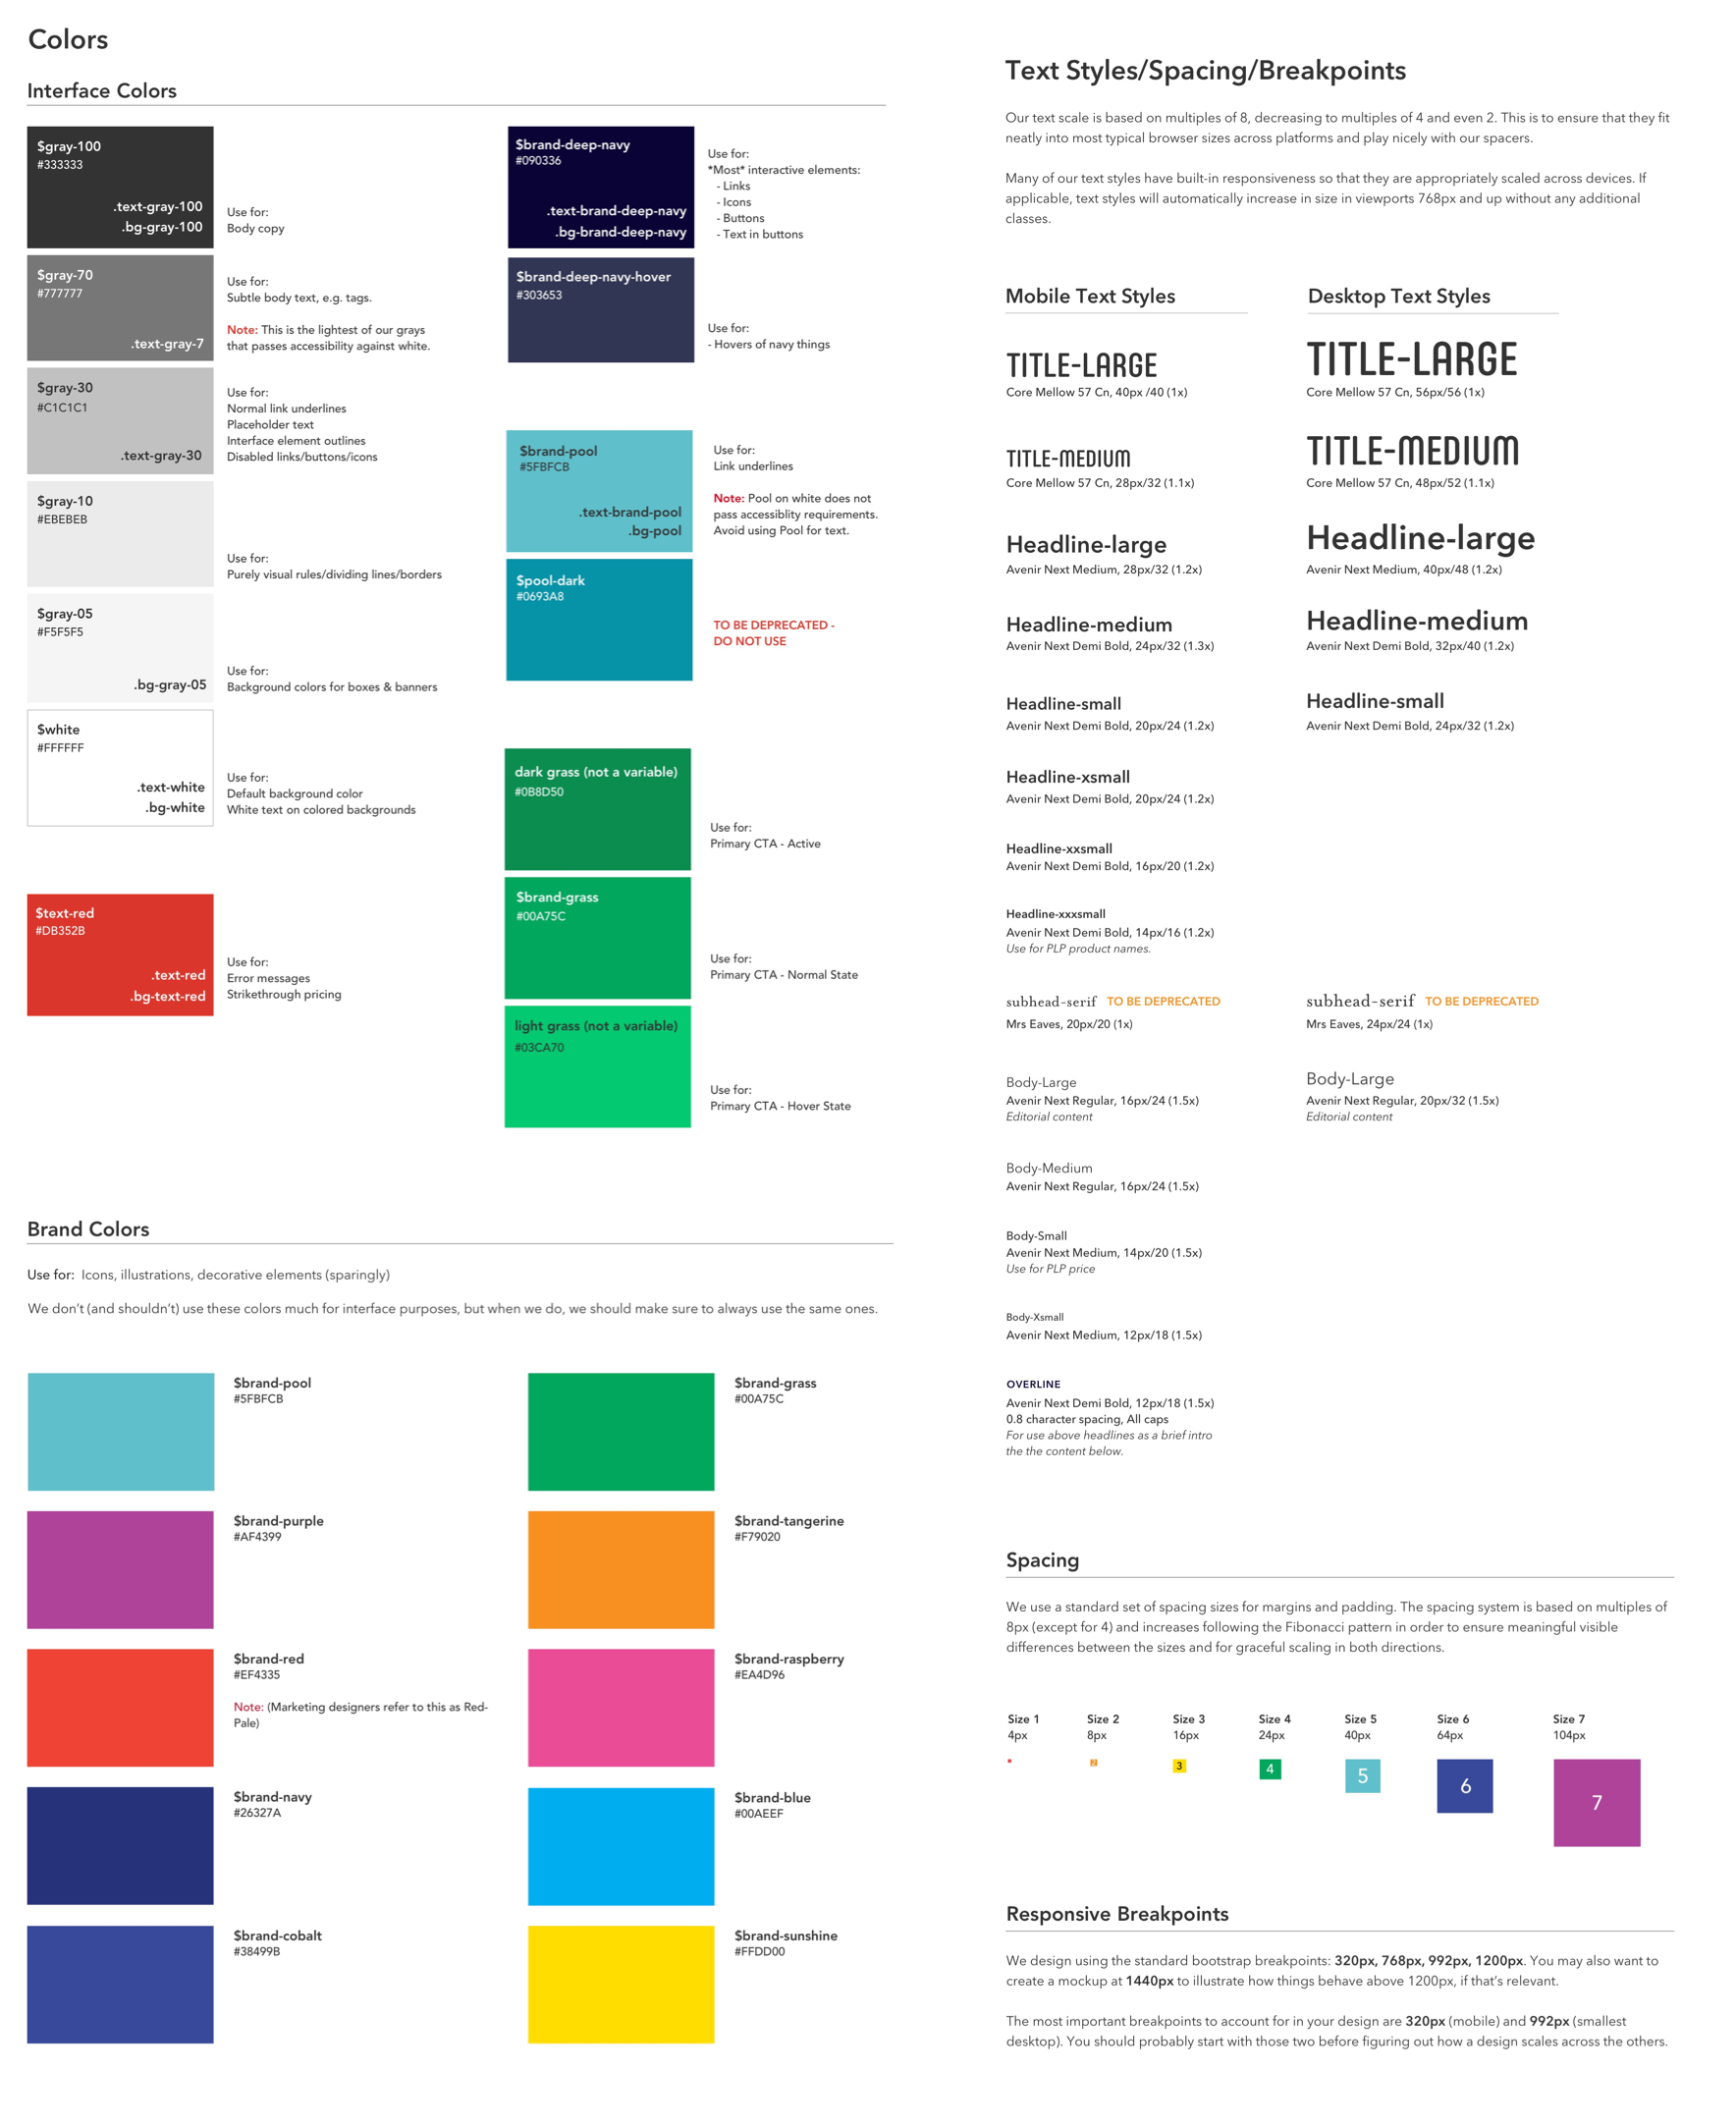
 Primary's breakpoints.
4. Test: Though I made the process sound very simple and logical above, in reality, there was a lot of guessing and checking and testing while I was working on developing the text styles and spacings. Design is, after all, not just math and logic, but feelings and aesthetics as well, and creating text scales and spacings in isolation would be a pointless exercise if they didn't work well in the context of a page. Because of this, I was simultaneously working on Primary's Ambassador Program page template and testing out type, spacing scales, and colors as I went along.
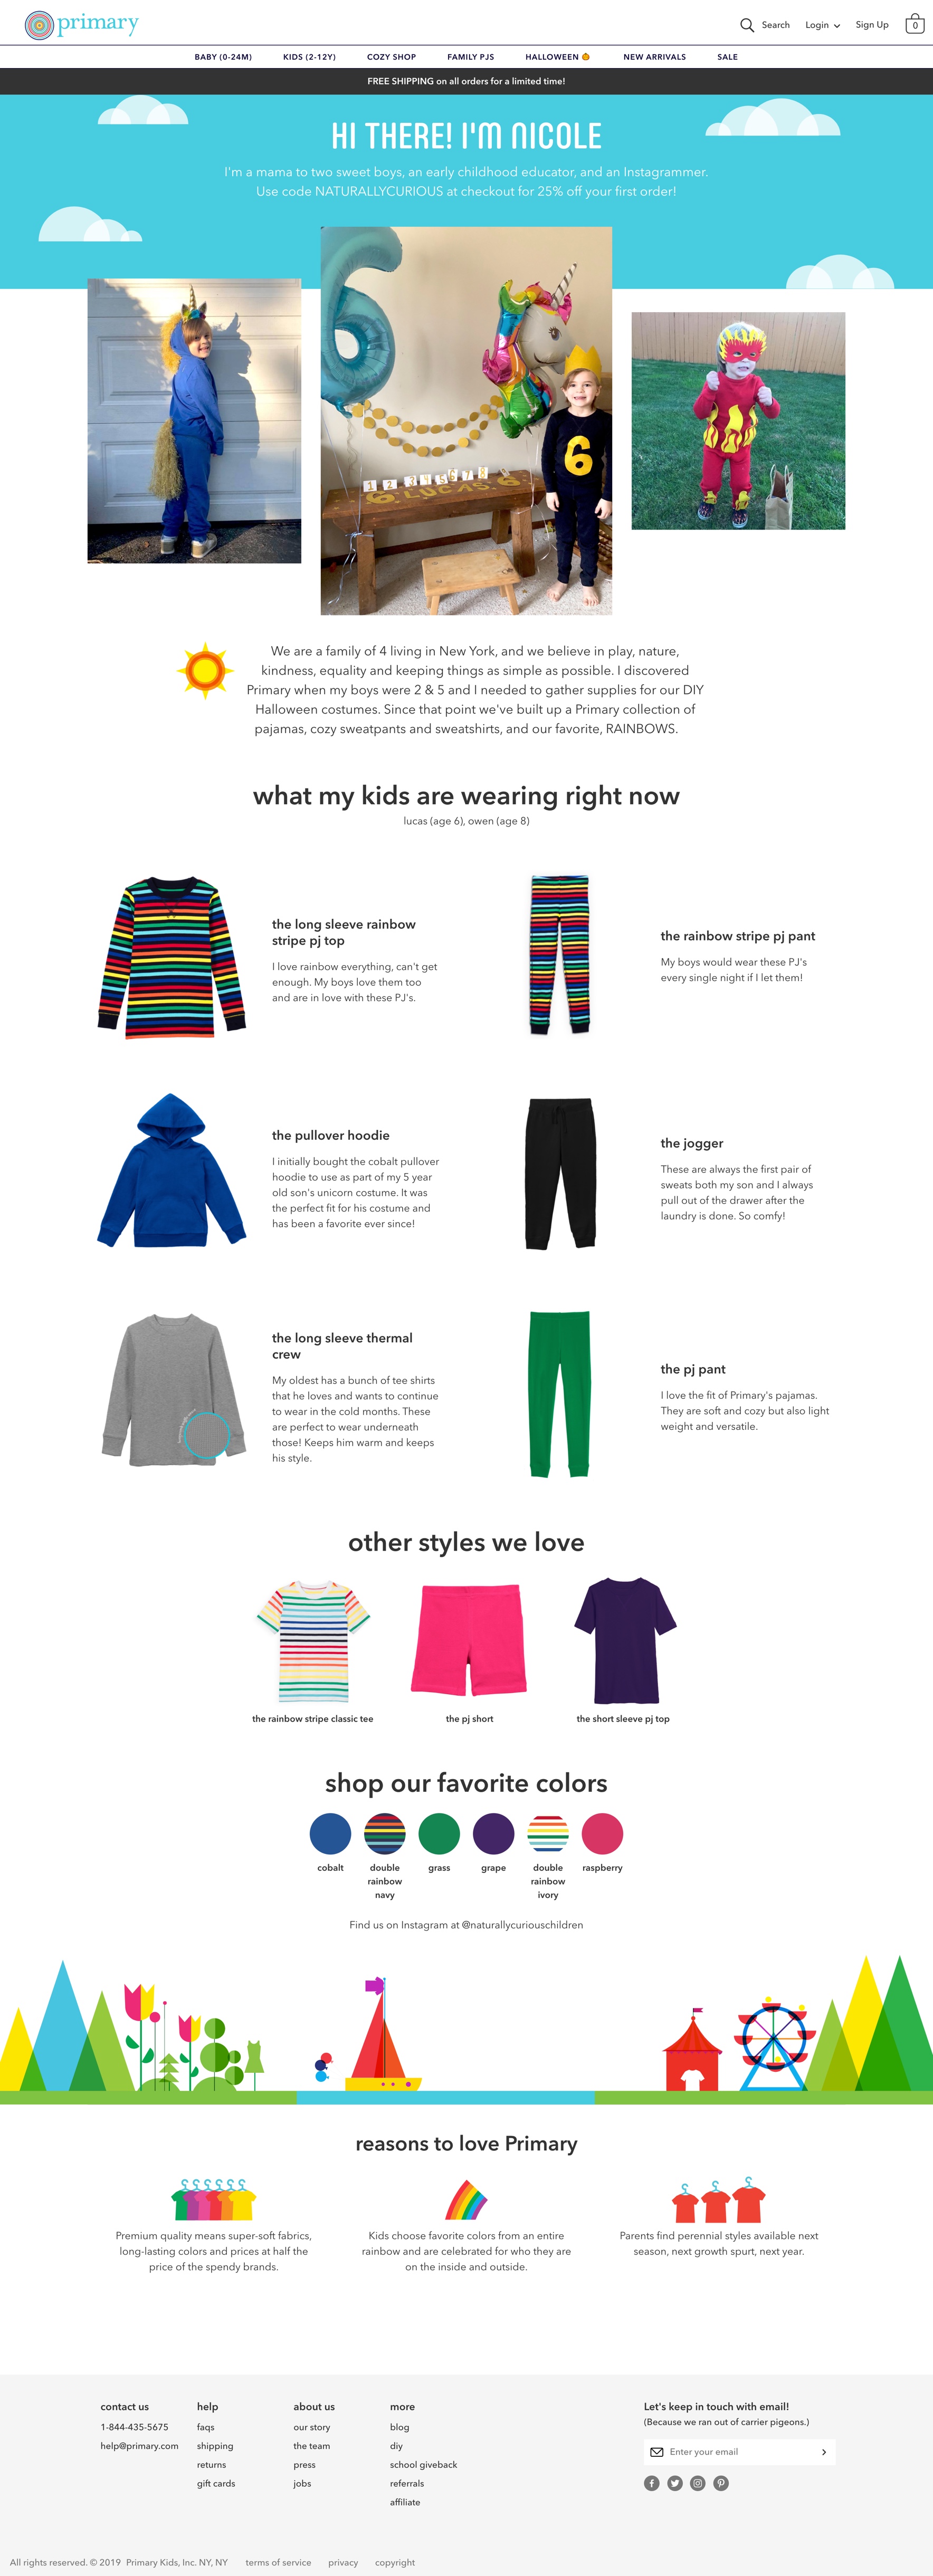
Testing on an actual page revealed issues around responsivness:
- Larger text sizes that worked well on large desktop screens looked far too big on a mobile phone. As a result, we built responsiveness into the text utilities, automatically shifting from the mobile size to the desktop size on viewports above 768px. This meant modifying the larger text sizes so that text on smaller screens would also look proportional and retain the intended information hierarchy. The smaller sizes remained the same on smaller screens in order to preserve legibility.
- Similarly, larger spacings that looked airy on large desktop screens created disproportionally massive gaps on mobile. To account for this, we created responsive spacing utilities tied to our bootstrap breakpoints so that we could now specify at which breakpoint a spacer size changes from one number to another. I also discovered that using the Fibonacci sequence for the spacing sizes allowed us to use the following rule of thumb: for any vertical space that looked right on desktop screens, the size that looked right on mobile screens was usually one size down, and vice versa. This realization led to significantly faster decisions when it came to designing vertical page flows, and allowed engineers to create reasonable-looking layouts on their own, a huge success in terms of scaling design.
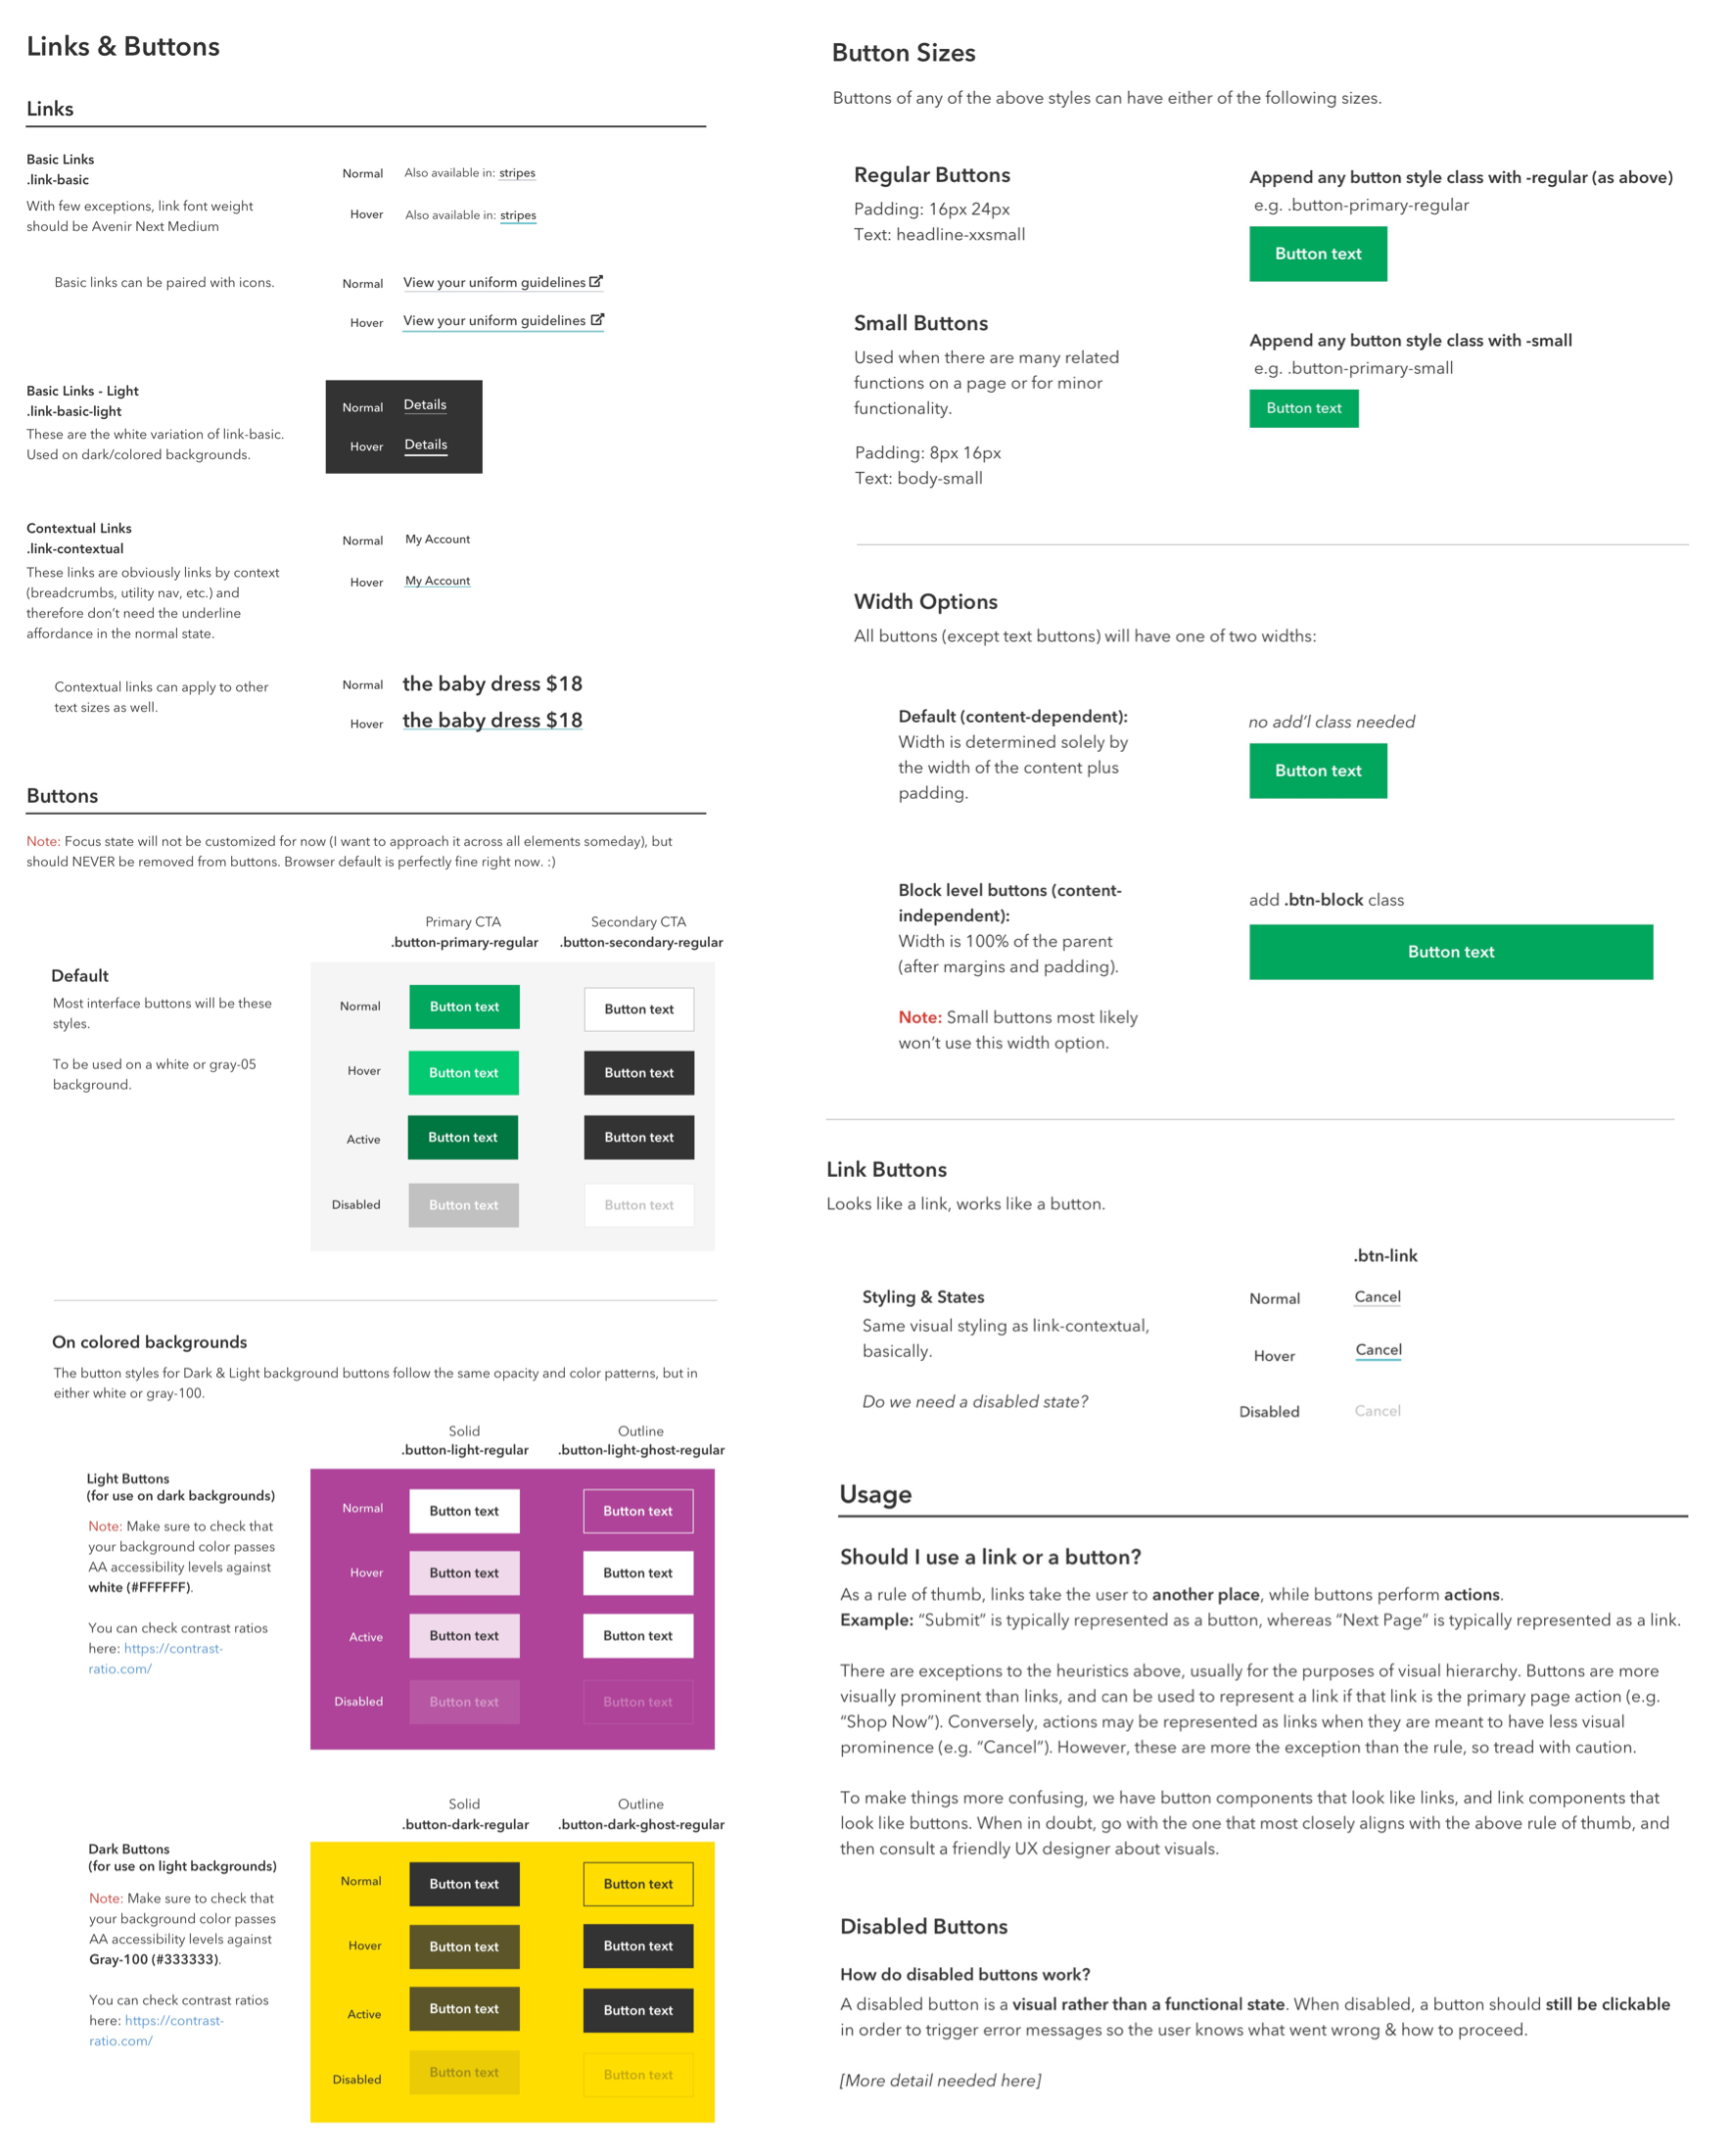
5. Iterate: As we used the style guide for more and more things, we made changes along the way, revisiting text weights and sizes, adding and removing utilities, deprecating fonts and colors, and adding more components and documentation. The style guide images shown here are merely the current state at the time of writing, and don't reflect the dozens of changes made since its inception over a year ago.
MOVING TOWARD A DESIGN SYSTEM
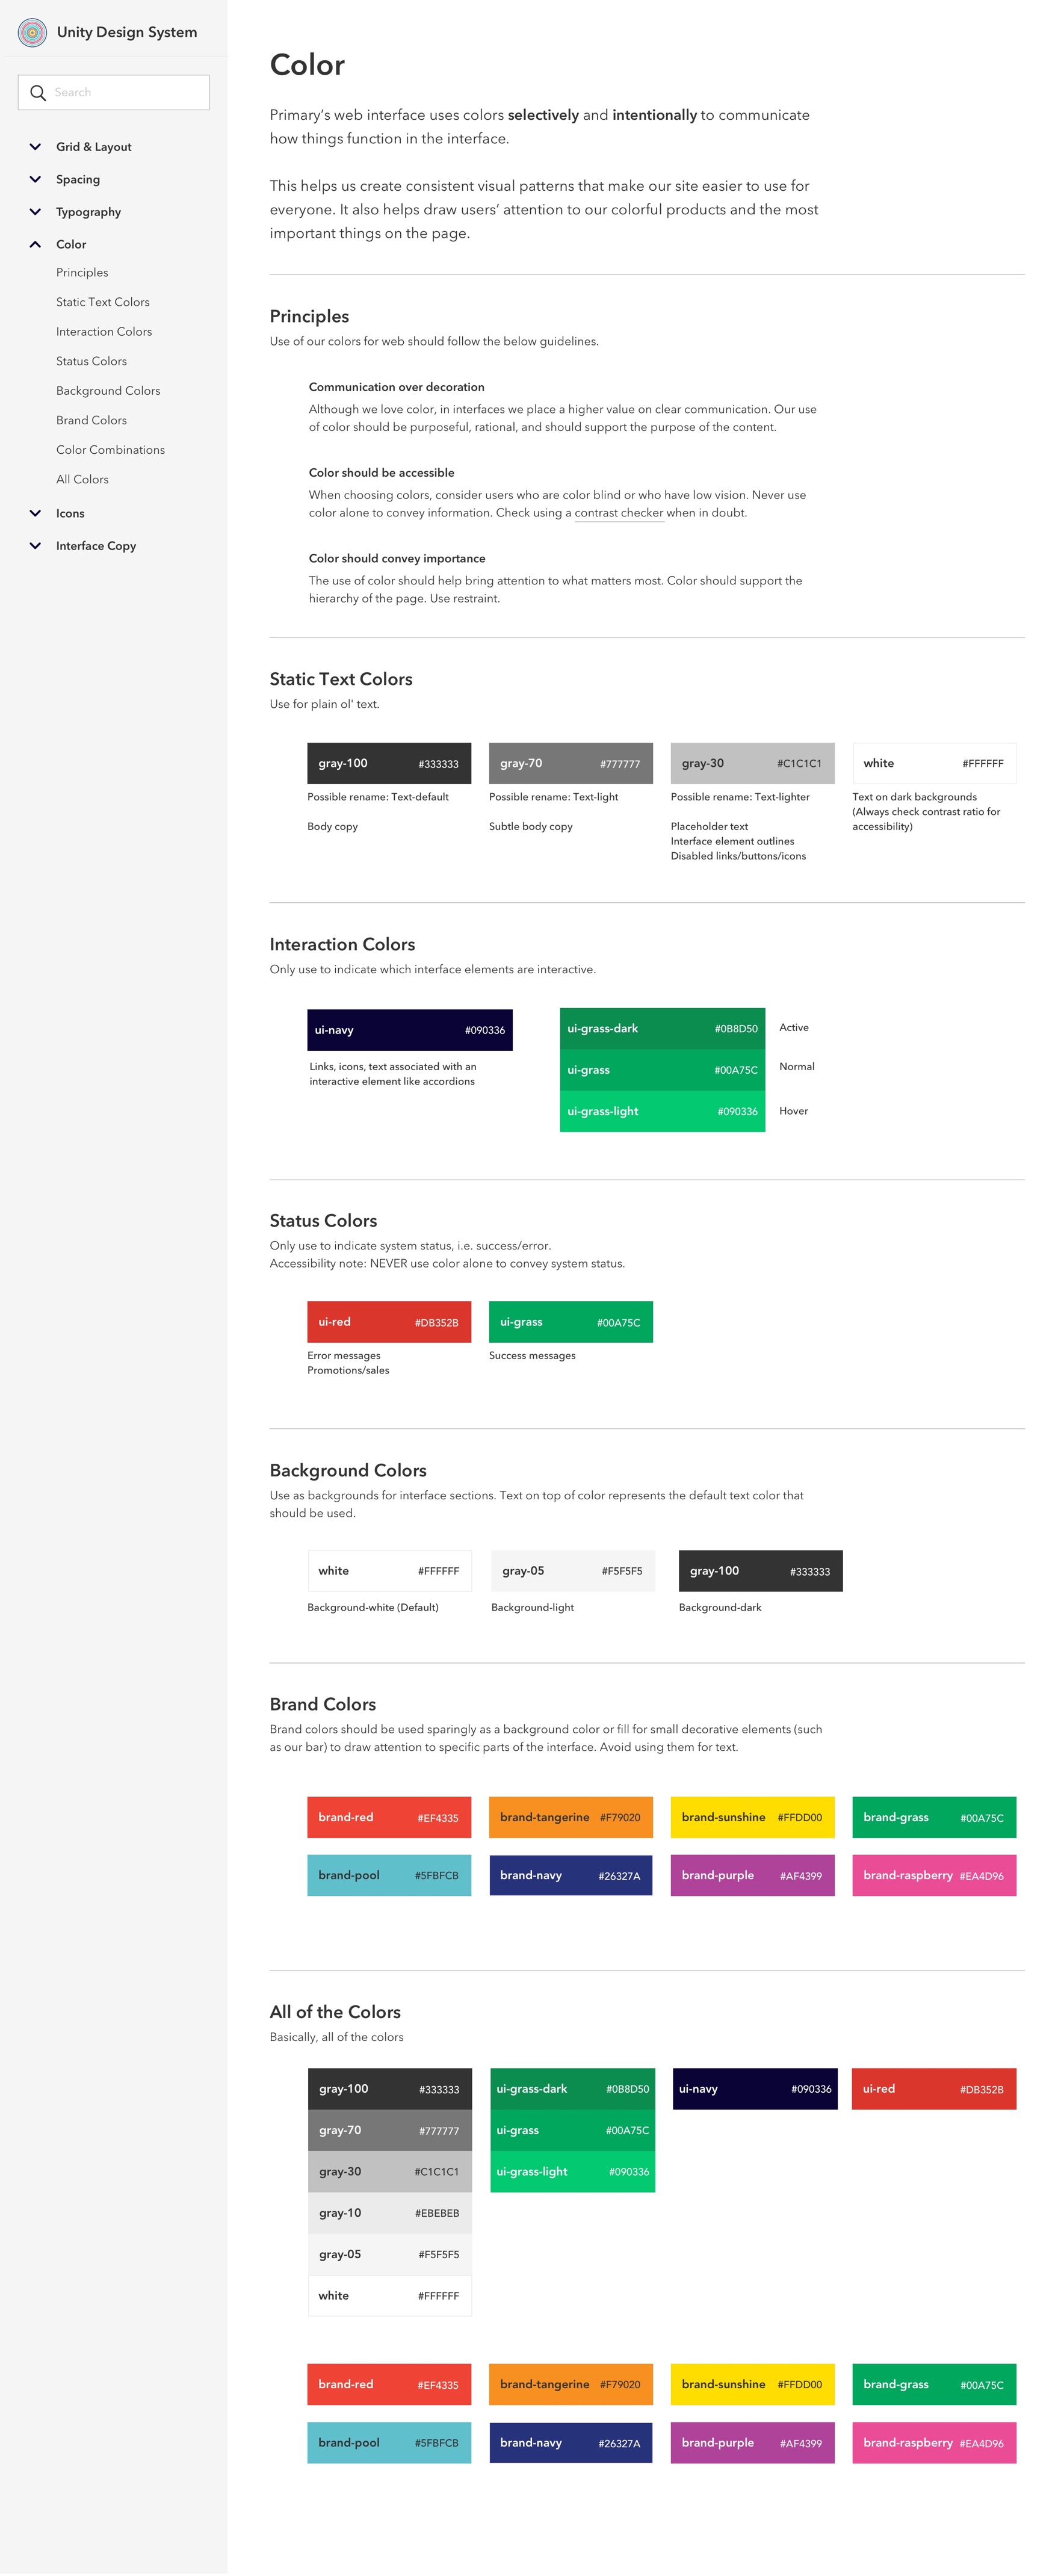
As both the design system and the team grew, design system documentation became more fragemented. We had information in various Confluence pages, Zeplin, the code itself, and, in people's minds and passed down through oral tradition. Onboarding full-time and freelance designers and engineers into the design system became a huge growing pain. We needed to create a more accessible and centralized place to store our style guide.
Typically, design system documentation written by engineers was written for other engineers, and didn't contain visuals or provide enough detail around use cases for product design. Conversely, the visual documentation I had created had been created for myself and other designers, and didn't always refer to actual code or utility class names. This worked when most of the users of the system were also building the system, and others could be taught piecemeal, but as the team grew and design system knowledge became more diluted, it became harder and more time-consuming to rely on engineers to educate each other on usage. Furthermore, there was simply more nuance to design than anyone could easily commit to memory, and there wasn't a single source of truth other than, well, me. And that certainly would not scale.
My engineering colleagues and I had been discussing this issue for a while, and had agreed that a centralized internal styleguide site would be the ideal solution, because it would be fairly simple to manage, new components could be easily added as they were built, any changes would automatically propagate, and all of the relevant information would be easily accessible to internal users. However, none of us had bandwidth or management approval to work on it. As a result, that idea sat in our minds for a while, never becoming reality.
When there was a companywide hackaton a few months later, one of the engineers and I jumped at the opportunity to dedicate some time to fleshing out the idea. We ended up tackling the problem from two different dierctions: he worked on getting an MVP page of the existing components and documentation up in a digital format while I used my usual design process to envision what a better future state might look like.
DESIGNING DESIGN SYSTEM 2.0
- Background: Because of the aforementioned issues with the existing design documentation, I wanted to create a resource to address the needs of both designers and engineers while also adhering to established best practices in design systems.
- Research: I was fortunate to be able to draw on my close working relationships with engineers at Primary. As the only product designer at the companyall design questions would eventually come to me, so I had been able to track trends in the kinds of questions being asked. , but I didn't want to merely stop there. So I looked into design system best practices in order to see how other organizations had done it.I began by looking at other examples of public design systems in this design system gallery to gather ideas and identify common methods of documentation. I particularly liked Shopify's Polaris Design System as well as Etrade's and CBRE Build's representations of colors. And of course, I also looked at Google's Material Design System, on which the original Primary Design System was loosely based. My biggest “aha” moment coming out of this was that it's not enough to just document what the components are or how to use them. It was also important to explain the underlying principles of the system alongside. We had just focused on documenting the "what" and "how," and hadn’t given enough time to documenting the “why,” relying instead on ad hoc conversations to communicate this to our internal users. Engineers tend to be natural systems thinkers, and lack of documentation about the conceptual basis for the system made design decisions seem more arbitrary and less, well, systemic. It also failed to support an important personal goal I'd had since starting as the sole product designer at Primary: creating more product design understanding across the organization in order to scale design in the absence of more designers.
- Planning & Information Architecture: After the research, I created an inventory of the components that already existed and organized them into common sections, resulting in a rough information architecture of the existing system. This would simultaneously function as a to-do list for tackling the project a little at a time once the hackathon was over.
More information coming soon! In the meantime, you can view the full style guide on Sketch Cloud.